Showing posts with label bargain. Show all posts

Saturday, March 8, 2014

Off the Shelf

After transforming the smallest bedroom into my dressing room, and organizing all my clothes along that fab closet wall, the teeny tiny (barely 25" wide!) closet in my bedroom didn't really have a purpose...  I didn't need the narrow bit of hanging storage it provided, and not much would fit on the one little shelf up top.  Eventually, it became a black hole of random things...  the junk drawer of closets!  Fortunately, I forgot to take a 'before' pic until it was all cleared out...

clean slate - even the closet rod & shelf are gone

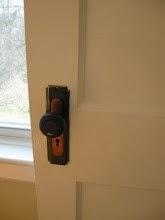
(Check out the boxed-in chimney taking up half the closet, as well as the awful 'pea soup' paint someone used here & in the entryway.  Who would ever choose this colour?!!)

Anyway, I'm always on a mission to maximize storage in such a small house, so I thought this closet would be more useful filled with shelves.  When 'the Boy' moved in, this project became even more important - I felt kinda bad that he had to keep his clothes in the little armoire out in the hall for months (ok, over a year...)

testing the fit of the new shelves...

After a couple coats of paint, the pea soup colour is gone, and the closet transformation is complete (and yes, I regret not painting the walls until after the shelf supports were in.  They made it pretty tedious!)
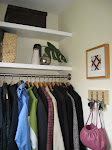
all done!


I love the look of a nice chunky shelf, so we added 2" faces to the front of the shelves.  They cover the mdf edge, and hide the shelf supports.

chunky shelves!

The best part is that this whole closet makeover was essentially free.  For the paint I used leftovers from previous projects (the taupe paint is the hallway colour, and the shelves were just leftover white semigloss), and all the mdf was left from an as-yet-unblogged studio project (stay tuned!). 


The shelves hold a surprising amount, too.  I'll spare you the current view of stacks of black work pants & an extensive collection of Bike Week t-shirts, but all of the Boy's clothes are in there now!  There was even space to sneak some of mine in (but just my painting clothes & some pjs, I didn't want to get greedy!)
:)

Thursday, August 26, 2010

Bumper Crop

No completed projects to talk about (yet!), but check out the latest harvest from my yard:


So, now what?  What can I make with these that doesn't require a fully-stocked pantry?  Because... well... mine's pretty bare!  :)

Monday, August 9, 2010

sm-ART

Now, I like a nice expanse of blank wall as much as the next person, but it's getting a little ridiculous around here.  Only one room in my entire house has anything hanging on the wall, so I thought I'd better start doing something about it.  Here comes my favourite DIY (and cheap!) wall art...


First I purchased and assembled stretcher bars (from an art supply store) in the dimensions to best fit my space (this is a great way to get a custom-sized piece for that hard-to-fit area!).

Then I found a piece of fabric in a bold, modern print (the bolder the better, if you want fabric to function as art), and simply stretched it tight over the stretcher frame:


Really bold prints can be tough to find, but I'm a huge fan of Marimekko prints, so I immediately knew that's what I wanted to use and just had to wait to find it for the right price (like lots of desiger fabrics, Marimekko pieces can be a bit pricey).

*The number one rule of thrift, (in my opinion, anyway!) is patience.  I searched places like Ebay and Etsy for a couple of months before I eventually found this print (called 'Tuuli' or wind) as a remnant, for a great price!  Total cost for this piece of 'art' was about $30 (fabric + stretcher bars), and it's 24"x36"!


It's hanging in my upstairs hallway, right above the stairs.  I love how the grey echoes the colours of my bedroom.  And I believe this is also the first time I've posted pics of the new paint in the hallway (upstairs + down), but I'll have more on that later!

For one last take on the 'fabric as art' idea, some of you may remember catching a glimpse of the other Marimekko print I have, which is currently hanging in my kitchen:


This print is called 'Unikko', and it's travelled with me for a few years now.  Not sure if it'll stay in the kitchen, but for right now it's one of the few things I like about that room, so it stays! :)

Wednesday, June 16, 2010

One Last Thing...

I know I said my bedroom was (finally) finished, but there was one last detail I wanted to take care of.  There wasn't much furniture in the room (just the bed), so I wanted to add a small chair (even if it's just a place to pile clothes on, let's be honest!).

I picked up this 'lovely' little number at a Salvation Army thrift store for just $4.99(!):


 Add a bit of fabric, a bit of sewing, and a staple gun, and...


 Still loving the layers of colour!  :)

Tuesday, June 1, 2010

Useless Boobs and a DIY Ceiling Medallion

Forgive me, but I happen to have a particularly strong hatred toward boob lights.  Whether it's their generic brassiness, their overwhelming prevalence (my house has lots of them, and I bet yours does, too), or that silly nipple, I don't know.  But I can't stand them, and I'm on a mission to eradicate my house of them, one by one.  (Current count: 2 down, 4 to go)

image of standard brass ceiling fixture that looks like a woman's breast

OK, rant over.  You may recall seeing the brand new light fixture in my bedroom makeover the other day.  Well, when I first replaced the original fixture (no, it wasn't a 'boob' this time), I ran into a bit of a problem:

close up detail image of gap around new smaller light fixture on ceiling

There was an unsightly gap around the base of the new fixture, because it wasn't as wide as the old one.  I immediately thought that a ceiling medallion was the answer, but since this makeover was on a very tight budget, I didn't rush to shell out the $30-$40 it'd cost for a (small) new one.  I figured there had to be some way to make my own, so I started searching online and looking in thrift stores for something I could use.
Then one day the proverbial 'lightbulb' went on.  Being of the 'waste not, want not' mentality, I figured, why not use one of those useless boob lights I've been amassing in my bid to rid my house of them?  Perfect!
 
image of interior of flushmount boob light fixture

I stripped the 'guts' out of it,

image of brass boob light fixture with lighting components removed


removed the socket that the bulb goes into, and the foil lining, and used a few coats of leftover white ceiling paint to get rid of the brass look.

DIY drum pendant light with DIY ceiling medallion made from boob light

Et voila!  No more gap around the fixture, and the 'boob' has regained its usefulness and been kept out of the landfill.  Total cost: $0 - my favourite kind of DIY!

alternative image of DIY pendant light and ceiling medallion from directly below lightbulb

Thursday, May 27, 2010

Bedroom Makeover - Final

At long last, the bedroom makeover is finished. Well, for now, at least! Here's what I started with:

blah bedroom before picture


Pretty sad, right? And after a little painting, some sewing, some more sewing, and a few more tweaks, here's how it looks today:

updated bedroom after picture

Ahh, that's better!  My goal was to make the bedroom a calm and relaxing 'nest' with shades of grey and mauve.  I tried to use enough layers and textures to keep it cozy and interesting.
 
The most recent additions are the light fixture, which went from this old-fashioned 'beauty'

image of old style square glass ceiling light fixture


to this simple drum pendant

new DIY grey drum pendant light fixture


and the purple paint on the wall behind the bed.
I felt like the bed looked odd floating against the white ceiling/wall, and the room was just lacking somehow.  A bit of painters' tape and a sample-sized can of 'Grey Amethyst' were just what it needed to wake things up!

midway picture of bedroom with painted walls, new duvet cover and plain white sloped wall behind headboard

image of purple painted rectangle with rounded corners behind headboard

My vintage white bookshelf headboard virtually disappears behind the pillows, so the purple on the wall acts as a sort of painted headboard, giving the bed more presence.  It also addresses the whole 'can't paint the wall because it's actually the ceiling' dilemma.

close up detailed picture of rounded corner on painted headboard

And it looks good with the grey and white 'Moroccan' cotton rug I found at the grocery store (of all places!)

Finally, what girl can resist a few feminine details like sequins and fresh flowers? :)


detail picture of small vase of purple lilacs against dark purple painted headboard

detail image of dark grey sequined pillow against pale grey bedding

So there you have it.  My complete bedroom makeover on the (very, very) cheap!  Actual spend, after using various gift cards I'd hoarded(!), was right around $100.

What do you think?  My favourite part, impact-wise, is the purple wall.  How about you?  What would you do differently?

Friday, April 2, 2010

Bedroom - Part 2

Last time around, I showed you the room I started with, and the new paint colour.  What I didn't show you was the VERY first update I made - the mattress.  It was a long time coming, but I finally bit the bullet a couple months ago and splurged on a super plush mattress.  I now think of it as my princess bed, because I feel like a princess every time I sleep in it (even now, months later!).  The cushiness just feels like luxury - definitely a worthwhile splurge!

Anyway, now it's time to add in some of the details.  What I wanted for this room was a warm and cozy retreat.  Layers of soft grays, taupes, and purple shades, with some modern and girly touches to balance things out (stay tuned for those).

First up, I needed bedding to go with the new colour scheme:


I couldn't find a duvet cover that I liked, in the right colour, for less that $70 (and most were more than that).  Since this bedroom makeover was on a serious budget (especially after the mattress splurge!), that just wouldn't do.  I made this one out of a couple of sheets, for about $15, so that fit the bill!


Oh, and check out the cute lamp I found, that had all the right colours on the shade:


Not only that, but it only cost me $5 (after using a gift card), AND it was short enough to fit under the slope of the ceiling - a tall order, as it turns out! :)

Still to come:  replacing the overhead light fixture, a little window dressing, and a small chair, perhaps?

Friday, January 15, 2010

Organization Makes Me Giddy

There's one room in my house that I end up spending most of my time in, and I'm pretty sure I haven't posted any pictures of it yet (it's late, or I'd check). It's my studio, it's the largest bedroom upstairs, and if you're wondering what it is that I DO in there, have a look over yonder
<-------

Anyway, it's a work-in-progress (aren't they all!?), so I'm not ready to show off the whole thing yet, but I couldn't wait to show my latest bit of organizing/thrifting/DIY awesomeness. But first, let's get the 'Before' mess over with quickly, bandaid-style:


Ugh. Ok, that's all you're getting, and I insist you forget you ever saw that. My propensity for making (or attempting to make) practically everything, means I have A LOT of stuff. And up until recently, no place to put it all.


Now check this out! The two white bookshelves were an absolute SCORE from Kijiji (I showed up expecting to buy just one, it turned out that they had two after all, and I got the two of them for just the $15 I'd planned to pay for only one).


As a side note, for those of you in the US: do you have Kijiji? I only ever see Americans talk about Craigslist...

Anyway, they were in great shape, but since I'm apparently not one to be happy with plain white shelves, I lined the backs of them in this cool 'formica'-like stuff that looks like bamboo (formica=weird, I know. But it was relatively cheap, easy to work with, and I love the look of it!):

(and no, I don't typically store placemats and stemware in my studio. I use these random objects as photo props, and my business cards are just in the glass because I think they look cool)


The fun stripe-y pegboard is super functional, but it's also practical: shelves all the way along that wall would've made for a tight squeeze trying to walk around my extra large work surface that's almost as wide as the room. This way I still get the storage, but it doesn't take up any floor space. (The stripes weren't for function, though. Just like the bamboo stuff lining the shelves, they're there because I think they make it more interesting, and because I can't leave well enough alone.)

Anyway, that's it for now. Maybe next time I'll show you how I store my ridiculous fabric stash. :)

Saturday, January 9, 2010

What a Pair!

In my quest to furnish this house (a quest which is far from over), I happened upon these at a thrift store:
Someone had (obviously) already tried to re-upholster them, but the result was pretty lumpy and, well, not pretty. But at $8 each, I figured I (and some lovely fabric) could give them a new life.


Not bad, eh?! The fabric was a remnant from a favourite fabric store in Toronto, and I was lucky to have juuuuuust enough to do the two of them. After replacing the foam on the seats and recovering, the chairs ended up costing about $15 each. Now if only the place where I want to put them wasn't over-run with other projects, I could show you them in their new 'home' rather than lined up against the wall, 'jail booking photo'-style. Sigh.

Monday, November 23, 2009

Making an Entrance

So I finally finished my entryway. Here's what it looked like before:


It was the only 'room' in the whole house that hadn't been painted before I bought it. Combine that with the rickety shelves, the sagging wooden closet rod, the large cracks in the plaster caused by jacking it up this past summer:


and the holes made by the electrician who wired in an outside light for me:


and it definitely needed some TLC. What followed was a couple weeks of patching, mudding, taping, mudding, sanding, mudding, sanding, repeat. Here's a 'work in progress' shot:


And finally, the end result:


A fresh coat of paint on walls & ceiling, new shelves and closet rod, the new light, and some DIY key hooks.
Oh, and those stylin' rubber boots aren't there just to look pretty - they're a necessity when it comes time to clean garbage out of the ravine next to my house! :)


Now THIS I want to come home to.

**Update: for those of you who join me in a love of thrift, here's the cost breakdown:
repairing the walls $47.04
paint $23.32
decor $34.48 (includes light fixture, closet rod, shelves, key hooks, etc)
Total: $104.84

Saturday, November 21, 2009

Lighting Up

Yippee! I successfully swapped out my first light fixture (the first of MANY to come!)

Here's what was there before:


Calling it a 'fixture' is a bit of a stretch, I know. And apologies for the lame before shot - I had to crop it out of a larger pic since I didn't anticipate getting this excited about a light fixture (who knew?!)

Anyway, check out what's lighting up my world now:


Nice and simple, a little bit 'old school', and all for the low low price of just $4, courtesy of my local Habitat for Humanity ReStore. Do you have a ReStore in your neighbourhood? In my neck of the woods their deals can't be beat!

So there's a little sneak peek at my entryway transformation. The full 'reveal' is coming soon!

Wednesday, October 21, 2009

Detail-Oriented

Maybe I've lost sight of the big picture. Or maybe I'm just a little overwhelmed by all the work still on my 'to do' list. In any case, just about every room in my house is still beige and bland and waiting to be decorated, but check this out:


As it turns out, I forgot to take a 'before' shot of this one, but let me paint you a picture: a couple days ago my cold air return was a faded and paint-splattered dark brown and just downright dingy. I planned to replace it, but then thought 'why?' - it was still perfectly functional, just not very nice to look at. And given that those little 'hot air' vents cost $6 and up to replace, I can only imagine what this big one would've cost. As noted in (several!) previous posts, I much prefer the cost of a can of spray paint.
I chose this espresso brown in a satin finish, et voila! The pic doesn't really do it justice, but trust me - it looks brand new again. I also used the same colour to do the hot air vent in the same area (top right of the above pic), so that they match perfectly.

Oh, and here's a tip: while I had the grate out, I cut some black window screen (sold by the foot at my local hardware store) and stapled it over the opening in the floor. The duct cleaning guy suggested doing this so that I can simply vacuum the vent and any stray lint/dirt isn't automatically being sucked down into my ductwork and clogging it up. At about $3, it was a simple way to reduce the need for expensive duct cleaning. Works for me!

Saturday, October 10, 2009

Stand Tall

Since my 'big' projects don't seem to be coming together as quickly as I might like them to lately, it's time to take a look at one of the little details.

Did you happen to notice these in my dressing room project?


I just wanted to share a thrifty tip for helping tall boots keep their shape:


I took a simple plastic placemat (2 for $1 at my local dollar store), rolled it up, put it in the boot all the way down to the heel, and then zipped the boot back up.


Presto! The placemat unrolls in the boot just enough to fill out the calf and keep the boot upright.

Tuesday, September 22, 2009

Take a Number

The originals that came with the house:


But now that I've got a ladder (thanks, Kijiji!)...


I was finally able to put up my fab new house numbers! They're floating numbers, but (thanks to some awesome cutting and drilling help from a friend) I mounted them on a piece of reclaimed (aka garbage) acrylic which I frosted up just for the occasion.

LOVE them! They're just the first step in overhauling the look of the front of the house (remember this post?), so stay tuned!