Friday, December 31, 2010

Tiny Update & Happy New Year!

Now that most of the holiday hubbub is over, it occurred to me that I never did follow up about the front of my house.  I told you about finishing the deck, but at that point that awful front wall was still bare and ugly.  So just to prove I'm not a total slacker (even though I kinda am, since I took so long to post about it)...


Ta da!  I finally caught a break in the foul Fall weather (before Winter set in for good) and got it primed and painted.  MUCH better!

And in case you're wondering what all the fuss was about, here's what it looked like before (and why I had to bump it to the top of my to-do list!):

peeling paint


someone's brilliant attempt to cover missing paint with caulk. WITH THEIR FINGERS.


Oh, and while I was at it, I finally decided to just throw caution to the wind and remove this 'who-knows-what-it's-for-or-why-it's-there' piece of awesomeness:


And nobody died.


Oh yeah, Happy New Year!

Sunday, November 21, 2010

Christmas Giveaway

Ok, so this post isn't exactly 'house-related', but everyone loves getting something for free (right?), so I wanted to share... Thrifty Little Blog is hosting a great big Christmas giveaway, and one of the handmade items I sell is part of it!
Check out the giveaway here. You only have until Nov. 23rd at noon (Central time) to enter, so don't wait!

And because no post is complete without something to look at, here's a shot of the item I'm giving away (so you don't have to play Where's Waldo among all the other great prizes!)

Cashmere Gift Card Holder - Lotus

Sunday, November 14, 2010

Fabric Deliciousness (& Storage!)

When I was a kid, I had a Charlie Brown book called Happiness is a Warm Puppy.  Every page started with "Happiness is..." and ended with something awesome.  Like a warm blanket.  Or an umbrella and rainboots.  Anyway, I think the point was to enjoy the small pleasures in life, so I want to share one of mine...

Upstairs in the room I refer to as my studio, I make things. Christmas is coming, and these things I make make great gifts, so lately I've been making A LOT of them. Which means things like this happen:

(AKA bliss in yummy fabric form*)


Just having all these pieces cut and laid out ready to sew makes me very happy. Having the space to work this way - even happier!

(*wondering what those rows of fabrics turned into?  Many of them are hanging out right here)

A long time ago, I posted a little studio organization project I completed, and promised to post pics of my fabric storage... Well, it happens to be fairly neat right now, so here you go!


This is an antique piece my family used to use as a cabinet in our dining room.  Usually I'm more into 'vintage' than 'antique', but this cupboard works really well for storing lots of pretty fabric in plain sight.  (I also love that it has room on top to store all my shipping supplies!).  And yes, it's upside down, but it's been used that way for as long as I can remember - and personally, I get more storage out of it like this!

Unfortunately, it's still not sufficient for storing the ever-growing collection of a fabric hoarder like me...

it's a sickness, people! There really should be some kind of a 12 step program for this! 
As you can see, the bottom shelf of my rolling rack is full, too.  I've gotta say, though, even on a makeshift shelf like this the sight of such fabric abundance makes me happy. :D

As Charlie Brown might say, "Happiness is.... many organized stacks of yummy fabric!"

Wednesday, October 27, 2010

For My Dad: A Deck-laration

O happy day, it's finally finished!!

As I think I've mentioned before, I don't usually like to write about unfinished projects. And currently the front of my house is a bit of a mess as I work to scrape (and repaint, before it gets too cold) a section of it. But at long last, the new front deck is finished, and I've had a special request from Dad (without whom this deck would never have been possible!) to post pics of this project that's taken up much of the past two months of both our lives.
And I can't really argue with him - after so much hard work, it's time to show off the fruits of our labour!

In case you need a refresher, here's what the front looked like when I bought the house:

notice the original deck: tiny, rotten, and utterly useless

I wrote about a bit of an update a year ago (at the conclusion of another long project with Dad), and (drumroll please!) here's how it looks today:

please disregard the unpainted wall! :)

Ooooh... Ahhhhhh....You should see it at night, when light from inside shines out through the slats. Love it!

Since I moved in, three new houses have been built beside mine (all are to the right in the above picture), so one goal with the deck was to maintain a bit of privacy, so that I'll actually want to use this new outdoor space. (It's a good size - the main part is about 9'x11' - so I want to enjoy it!) Another goal was not to look too 'cookie-cutter', or like all the boring decks on new builds like the ones next door. To that end, I designed a railing that I think is a bit more modern and unique, and does a great job of screening the deck from the street and nearby houses.


Obviously I've still got lots of landscaping and clean-up to do (after that wall gets painted!), but this was another major step in converting what used to be the back of the house into a proper front entry. Plans for next year include moving the front door - we positioned the new stairs right in front of where I want it to go!

So, Dad: once again thank you. I learned a lot, and definitely couldn't have done it without you! And now that we're done, you've got to admit - it was at least a little bit fun, right?! :)  Love you!

As for everyone else, what do you think? I really like that it looks unique, but do you think anyone else will (ie. future owners of my home)?  Does it look more like the front of a house now?

Tuesday, October 12, 2010

Through the Looking Glass

It's been a long time since I've made any updates to my dressing room, so I wanted to share a useful little project I recently completed.

Before:  no place to store my jewellery (of which I admittedly have a lot, but I make jewellery - I've gotta model my own product, right?  That's what I tell myself, anyway)

fun fact: I've had this full-length mirror for as long as I can remember. The frame's been painted many different colours over the years, and painting it was one of my earliest 'decor' diy projects. (That first pre-teen attempt was to paint it blue with a black zigzag. No explanation for that one)

But after some sketching and building (and, ok, maybe a little re-thinking and re-building...) I came up with this:


After: Problem solved!  Lots of room for rings, earrings, and necklaces, and the mirror doesn't have to lean against the wall anymore - I even found a mod wallpaper remnant to pretty it up a bit (just $5 for almost a full roll at the Habitat for Humanity ReStore.  Have I mentioned how much I love the ReStore?!).


Rings are stored on pieces of wood dowel set into the pine framework, earrings hang from a metal bbq grill found on clearance and spray-painted brown, and S-hooks are used to hang necklaces from lengths of thin metal rod.


And as much as I love my jewellery, my favourite part is how it all disappears.  As you may remember from here, this room has just about everything else stored out in the open, so I wanted to keep this part of it looking sleek and un-cluttered.  I also think this piece will look even better when I get around to painting over the blah beige on these walls, but I haven't been able to settle on a colour yet. (Suggestions?)

Anyway, though I'm reluctant to think about just how long I've been picking away at this project (it looks simple, but it definitely tested my problem-solving skills!), I think the lesson here is that eventually any project can be finished. Timely, because remember my goal of completing that project I recently gave you a sneak peek of? Yeah, it didn't exactly materialize this weekend.  :(  A few significant steps closer, but still not finished.  One day, it too will be complete!

So, what do you think of my storage solution?  Do you prefer to keep your jewellery out on display?

Thursday, October 7, 2010

Sneak Peek

Here's a glimpse of the 'little' project that took over my life about a month or so ago...

lumber yard? or front yard?

progress!
Fingers crossed that by the end of the coming long weekend, the end of this project will also be in sight!  


Sunday, September 26, 2010

Happiness (by mail!)

So... I haven't exactly been all that forthcoming with pictures of some of the rooms in my house.  (All for good reasons, I can assure you!)  One of those rooms is the bathroom, because I have lots of plans for it, but - other than swapping out the toilet - it hasn't made it to the top of my 'to do' list yet.

Like much of my house, the bathroom seems like it was built for short people (fortunately, this isn't really a problem for me!)  The showerhead comes out of a sloped ceiling, so it was installed a lot lower than normal.


(to give proper perspective, the shower curtain rod is just over 5' high.  I had to drastically hem this standard-sized shower curtain to make it fit, and it still hits the floor!)

The previous owner/diy-'genius' installed the shower arm upside down (so that it pointed up rather than down) to try to compensate for the angle of the ceiling, but this setup was still far from ideal. Seriously, I'm 5'3" and the showerhead was only as high as my forehead!


 (check out that huge gap between the flange and the ceiling. They attempted to fill it with caulk, but come on!!)

Anyway.  A while ago I mentioned that I'd been contacted by CSN Stores to review one of their products. I really had a tough time deciding what to get because of their amazing and vast selection, until I found these:


A new, shorter arm, and the long adjustable extension arm with lovely rainshower head.  Problem solved!!

Here's the fully-improved view:


Look how much higher that is - the water actually comes out above my head now!  Happiness!

Now, the review:  The CSN Stores' selection was beyond extensive.  I was totally impressed by the variety of items I found on their sites - they have far more than I could ever find locally.  The order process was really simple, and their prices are low.  I'm a bargain shopper, so I really liked that they want to know if you find a lower price on any of their items.  I also liked that I got not only the standard order confirmation email, but also one telling me that my items had been shipped, as well as one when they left the border.  I live in Canada, and I know that shipments can sometimes get delayed going through customs.  It was awesome to get that update letting me know that they were almost here!
All said, I was super happy with the entire experience!

Wednesday, September 15, 2010

Step by Step

I know we all sometimes feel like projects are never-ending (especially home-improvement projects!), but lately, it seems like I can't quite get ANY of mine to the finish line.  They feel like they just go on, and on, and on... with no end in sight!

And I don't usually bother posting about 'in progress' projects, because I like doing the big 'before and after' all at once, and taking pics in between just slows me down :)

SO, since I don't have updates on any of the other projects I'm working on, here's a 'quick' fix I recently finished (you know, so I could at least feel a sense of accomplishment about something!)

When I moved in, this is what the post at the bottom of the stairs looked like:


Someone had the brilliant idea to add a pressure-treated (outdoor) post cap and ball thingy to the top of my simple, beautiful stair post.  To add insult to injury, they didn't even try to centre it so it would look halfways decent!  The ball thingy was off-centre and loose, so it'd spin around drunkenly ... anyway, it drove me crazy and it had to go.

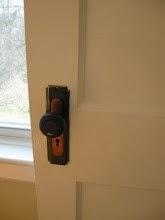
Here's what the post at the top of the stairs looks like, so I knew how great the bottom was supposed to look:


yeah, this pic was taken before I moved in... 
much cleaner than its current state! :)

Anyway, after a bit of demolition and some filling/sanding/repainting, normal has been restored, and I am happy!


I know it's a small thing, but I think it looks SO MUCH BETTER!  Its simple style suits the rest of my house - ornate it is not (which I think is one of it's best qualities!).

While I was at it, I sanded the handrail and repainted that as well.  The last paint job was really rough, and since day one I've had to be really careful running my hand along it, but no more!

How about one more look at the wonky work of whoever came before:


So, what do YOU think?  Anyone actually a fan of the added post cap/ball thingy combo?  Or do you think I'm nuts for getting worked up about such a silly little detail?

Thursday, August 26, 2010

Bumper Crop

No completed projects to talk about (yet!), but check out the latest harvest from my yard:


So, now what?  What can I make with these that doesn't require a fully-stocked pantry?  Because... well... mine's pretty bare!  :)

Monday, August 9, 2010

sm-ART

Now, I like a nice expanse of blank wall as much as the next person, but it's getting a little ridiculous around here.  Only one room in my entire house has anything hanging on the wall, so I thought I'd better start doing something about it.  Here comes my favourite DIY (and cheap!) wall art...


First I purchased and assembled stretcher bars (from an art supply store) in the dimensions to best fit my space (this is a great way to get a custom-sized piece for that hard-to-fit area!).

Then I found a piece of fabric in a bold, modern print (the bolder the better, if you want fabric to function as art), and simply stretched it tight over the stretcher frame:


Really bold prints can be tough to find, but I'm a huge fan of Marimekko prints, so I immediately knew that's what I wanted to use and just had to wait to find it for the right price (like lots of desiger fabrics, Marimekko pieces can be a bit pricey).

*The number one rule of thrift, (in my opinion, anyway!) is patience.  I searched places like Ebay and Etsy for a couple of months before I eventually found this print (called 'Tuuli' or wind) as a remnant, for a great price!  Total cost for this piece of 'art' was about $30 (fabric + stretcher bars), and it's 24"x36"!


It's hanging in my upstairs hallway, right above the stairs.  I love how the grey echoes the colours of my bedroom.  And I believe this is also the first time I've posted pics of the new paint in the hallway (upstairs + down), but I'll have more on that later!

For one last take on the 'fabric as art' idea, some of you may remember catching a glimpse of the other Marimekko print I have, which is currently hanging in my kitchen:


This print is called 'Unikko', and it's travelled with me for a few years now.  Not sure if it'll stay in the kitchen, but for right now it's one of the few things I like about that room, so it stays! :)

Monday, July 26, 2010

Coming Soon!

Something very exciting will be coming soon to my little corner of the blog world...
I've been contacted by CSN Stores to do a review of one of their products!
I must've been living under a rock, because up until a couple months ago, I wasn't familiar with all they have to offer. Did you know that they sell everything from dining room furniture to vessel sinks and fire pits?  They even sell tools for when you want to get your DIY groove on.
In fact, they have over 200 stores!
And, of course, the all-important part - they ship to Canada!
I've heard great things about their customer service, and love the huge selection they have available, so I'm very excited to receive the item I've picked out.  Stay tuned!

Wednesday, June 16, 2010

One Last Thing...

I know I said my bedroom was (finally) finished, but there was one last detail I wanted to take care of.  There wasn't much furniture in the room (just the bed), so I wanted to add a small chair (even if it's just a place to pile clothes on, let's be honest!).

I picked up this 'lovely' little number at a Salvation Army thrift store for just $4.99(!):


 Add a bit of fabric, a bit of sewing, and a staple gun, and...


 Still loving the layers of colour!  :)

Tuesday, June 1, 2010

Useless Boobs and a DIY Ceiling Medallion

Forgive me, but I happen to have a particularly strong hatred toward boob lights.  Whether it's their generic brassiness, their overwhelming prevalence (my house has lots of them, and I bet yours does, too), or that silly nipple, I don't know.  But I can't stand them, and I'm on a mission to eradicate my house of them, one by one.  (Current count: 2 down, 4 to go)

image of standard brass ceiling fixture that looks like a woman's breast

OK, rant over.  You may recall seeing the brand new light fixture in my bedroom makeover the other day.  Well, when I first replaced the original fixture (no, it wasn't a 'boob' this time), I ran into a bit of a problem:

close up detail image of gap around new smaller light fixture on ceiling

There was an unsightly gap around the base of the new fixture, because it wasn't as wide as the old one.  I immediately thought that a ceiling medallion was the answer, but since this makeover was on a very tight budget, I didn't rush to shell out the $30-$40 it'd cost for a (small) new one.  I figured there had to be some way to make my own, so I started searching online and looking in thrift stores for something I could use.
Then one day the proverbial 'lightbulb' went on.  Being of the 'waste not, want not' mentality, I figured, why not use one of those useless boob lights I've been amassing in my bid to rid my house of them?  Perfect!
 
image of interior of flushmount boob light fixture

I stripped the 'guts' out of it,

image of brass boob light fixture with lighting components removed


removed the socket that the bulb goes into, and the foil lining, and used a few coats of leftover white ceiling paint to get rid of the brass look.

DIY drum pendant light with DIY ceiling medallion made from boob light

Et voila!  No more gap around the fixture, and the 'boob' has regained its usefulness and been kept out of the landfill.  Total cost: $0 - my favourite kind of DIY!

alternative image of DIY pendant light and ceiling medallion from directly below lightbulb

Thursday, May 27, 2010

Bedroom Makeover - Final

At long last, the bedroom makeover is finished. Well, for now, at least! Here's what I started with:

blah bedroom before picture


Pretty sad, right? And after a little painting, some sewing, some more sewing, and a few more tweaks, here's how it looks today:

updated bedroom after picture

Ahh, that's better!  My goal was to make the bedroom a calm and relaxing 'nest' with shades of grey and mauve.  I tried to use enough layers and textures to keep it cozy and interesting.
 
The most recent additions are the light fixture, which went from this old-fashioned 'beauty'

image of old style square glass ceiling light fixture


to this simple drum pendant

new DIY grey drum pendant light fixture


and the purple paint on the wall behind the bed.
I felt like the bed looked odd floating against the white ceiling/wall, and the room was just lacking somehow.  A bit of painters' tape and a sample-sized can of 'Grey Amethyst' were just what it needed to wake things up!

midway picture of bedroom with painted walls, new duvet cover and plain white sloped wall behind headboard

image of purple painted rectangle with rounded corners behind headboard

My vintage white bookshelf headboard virtually disappears behind the pillows, so the purple on the wall acts as a sort of painted headboard, giving the bed more presence.  It also addresses the whole 'can't paint the wall because it's actually the ceiling' dilemma.

close up detailed picture of rounded corner on painted headboard

And it looks good with the grey and white 'Moroccan' cotton rug I found at the grocery store (of all places!)

Finally, what girl can resist a few feminine details like sequins and fresh flowers? :)


detail picture of small vase of purple lilacs against dark purple painted headboard

detail image of dark grey sequined pillow against pale grey bedding

So there you have it.  My complete bedroom makeover on the (very, very) cheap!  Actual spend, after using various gift cards I'd hoarded(!), was right around $100.

What do you think?  My favourite part, impact-wise, is the purple wall.  How about you?  What would you do differently?