


2009. A year full of highs and lows, it was the very best of times, and the worst, often all at once.
I bought a house, (started a blog!), turned thirty, and lost a job.
spoke up. kept quiet.
laughed. cried.
succeeded. failed. persevered.
found the silver lining.
faced fears. conquered obstacles. embraced change.
Thursday, December 31, 2009
Wednesday, December 23, 2009
Decking the Halls
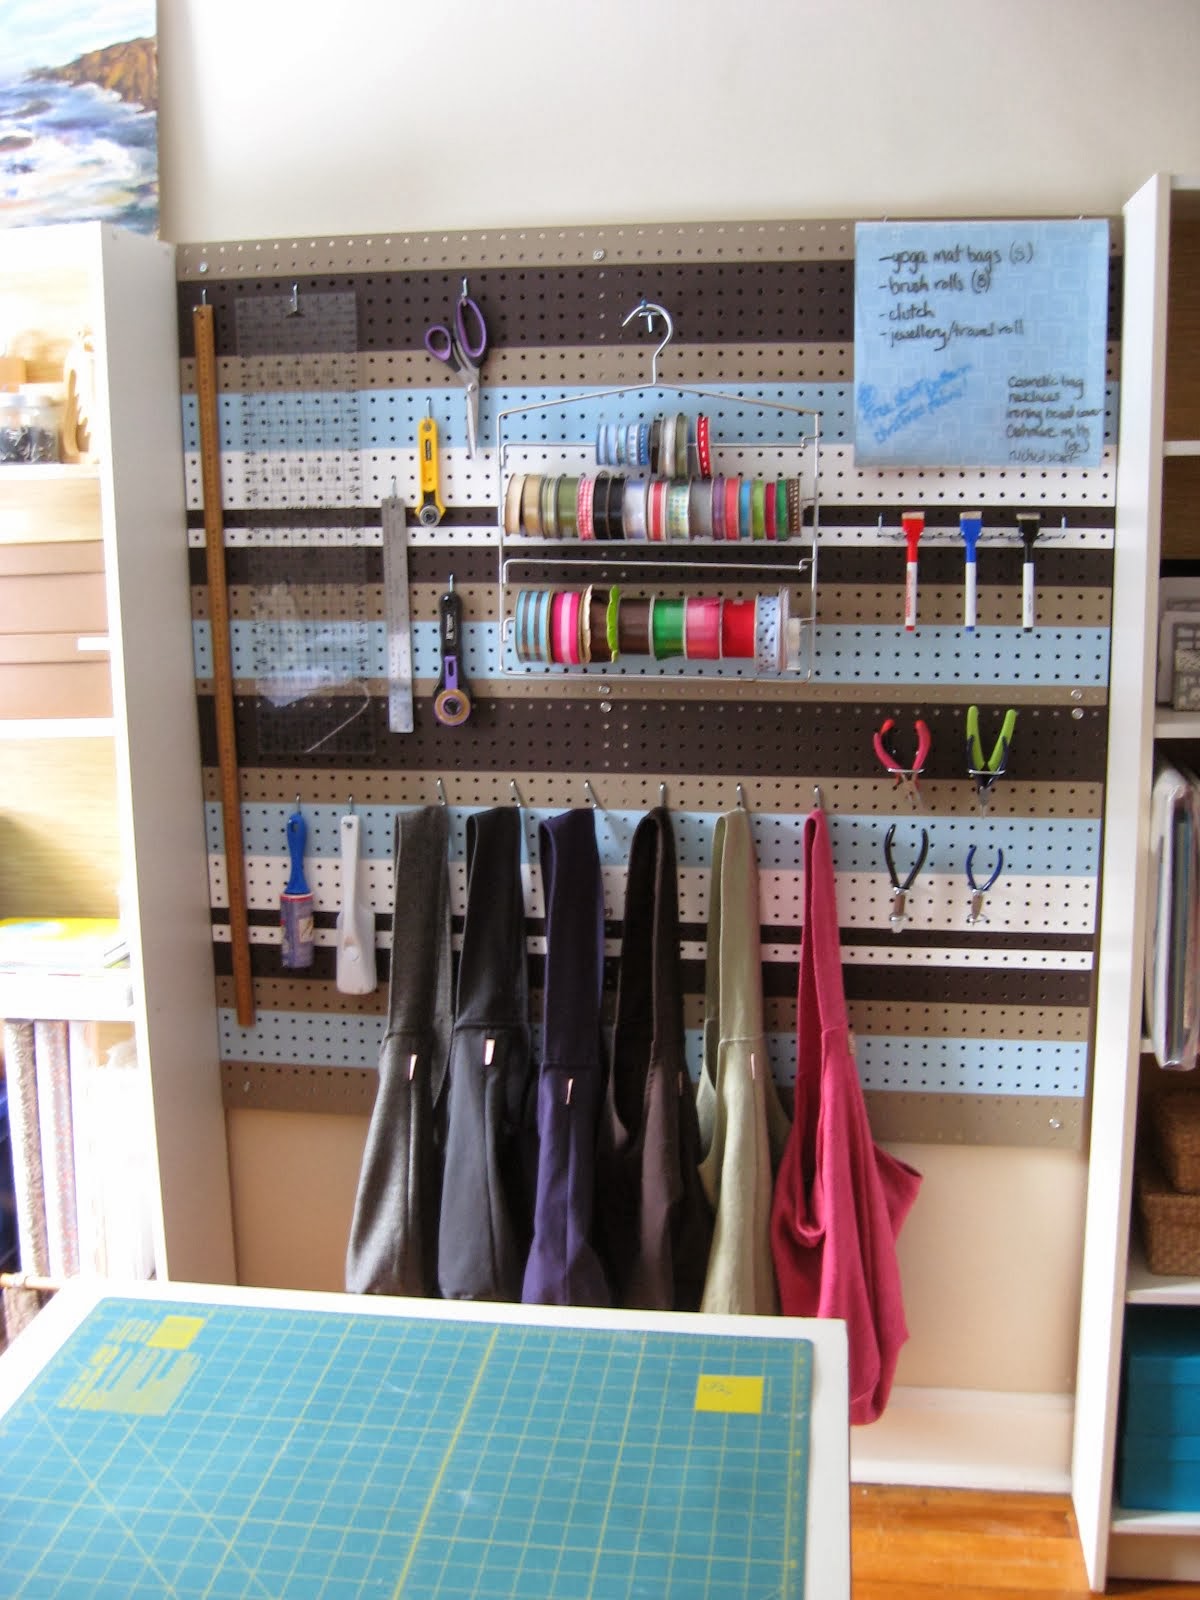
Sorry for going AWOL for a while there, but work on the house has had to be put on hold for a bit in the lead up to the holidays. I've spent most of the past few weeks in my studio doing my Christmas 'making' (definitely not to be confused with Christmas baking) - both gifts to give and several custom sewing orders for others to give to their family and friends. One upside(?) is that it's given me lots of time to think about all the changes I want to make to that room, so watch for that in the new year!
Anyway, for now I thought I'd share a few pics of how I've decorated for my first Christmas in the house...
I got my craft on one day and made some mod paper ornaments to hang in the front window. (An idea borrowed from here.)

Inspired by this, here's a wreath I made as a gift for someone. Someone I don't think reads this blog. I guess we'll see! :) I love it, and am tempted to keep it for myself, but I'll just have to make another one when I have a bit more free time!

In lieu of the traditional garland on my very narrow staircase, I opted for a simple ribbon:

And finally, the tree. Due to general busy-ness and the as yet un-organized/un-decorated state of my living room, I contemplated not putting it up this year. But I'm glad I did - nothing beats the light of a Christmas tree! (big thanks to mish (the ribbon guru) for all of her tree-decorating assistance - ribbon-related and otherwise!).

And a special gift from these guys to commemorate this milestone, which I thought was very, very sweet of them :)

(reads: First Christmas in the New Home, 2009)
Happy Holidays!
Monday, November 23, 2009
Making an Entrance
So I finally finished my entryway. Here's what it looked like before:

It was the only 'room' in the whole house that hadn't been painted before I bought it. Combine that with the rickety shelves, the sagging wooden closet rod, the large cracks in the plaster caused by jacking it up this past summer:

and the holes made by the electrician who wired in an outside light for me:

and it definitely needed some TLC. What followed was a couple weeks of patching, mudding, taping, mudding, sanding, mudding, sanding, repeat. Here's a 'work in progress' shot:

And finally, the end result:

A fresh coat of paint on walls & ceiling, new shelves and closet rod, the new light, and some DIY key hooks.
Oh, and those stylin' rubber boots aren't there just to look pretty - they're a necessity when it comes time to clean garbage out of the ravine next to my house! :)

Now THIS I want to come home to.
**Update: for those of you who join me in a love of thrift, here's the cost breakdown:
repairing the walls $47.04
paint $23.32
decor $34.48 (includes light fixture, closet rod, shelves, key hooks, etc)
Total: $104.84
Saturday, November 21, 2009
Lighting Up
Yippee! I successfully swapped out my first light fixture (the first of MANY to come!)
Here's what was there before:

Calling it a 'fixture' is a bit of a stretch, I know. And apologies for the lame before shot - I had to crop it out of a larger pic since I didn't anticipate getting this excited about a light fixture (who knew?!)
Anyway, check out what's lighting up my world now:

Nice and simple, a little bit 'old school', and all for the low low price of just $4, courtesy of my local Habitat for Humanity ReStore. Do you have a ReStore in your neighbourhood? In my neck of the woods their deals can't be beat!
So there's a little sneak peek at my entryway transformation. The full 'reveal' is coming soon!
Tuesday, November 10, 2009
One Step Forward, Two Steps Back
OK, here goes. This post has been a while in the making, mostly because I'm not a big fan of admitting 'failure'... and that's sure what this project felt like. But it's DIY reality, and it had a happy ending, so here it is! :)
I have a back porch. It has a roof. If you've seen any of the pics of my backyard (like the snowfall one below), they're taken from directly under this roof. Anyway, when the main roof and the front and back porches were re-shingled shortly before I bought the house, someone decided it'd be a good idea to only do the job half way. They redid the shingles, but didn't install any flashing in the space where the roof meets the wall.
 Or a closer view:

I don't know if these pics are doing the gap justice. It was big, and causing problems. I really shouldn't be surprised, because I'm finding that so many things have been done in a similar manner (half-assed). But hey, I'm always up for a challenge, so I figured I could make it right.
I did lots of research, and gathered the requisite tools and supplies to install step flashing to keep water from entering the gap. I scheduled the assistance of a ladder-holding friend (thanks, Mish!). I found myself a bright, sunny day. I even got up there on each side of the peak and ran the circular saw along the roof line, to get enough of the shingles out of the way to get the job done (this was step one, and my first ever experience using a circular saw. My advice? Try it on solid ground first. But, hey, I got it done)
And then I hit a wall. Well, figuratively, at least. Basically, what I discovered that day was two-fold:
1. No matter how much I might wish otherwise, I do not have the arm strength of a man. Not even an average or somewhat wimpy man. That arm strength was a requirement of this job that I didn't anticipate.
2. I'm just not cool with working on that kind of angle, at that kind of height. The pics don't really tell you how high up I was, or how steep the roof angle, so just trust me: it was bad. Not bad for someone accustomed to such jobs, but bad for someone like me who's not a huge fan of heights to begin with. Add to that the wobbliness inherent in using a ladder at that height and...
End result: I eventually had to concede defeat, and call in a handyman. Thankfully Mish (the ladder-holding friend) knew of one who could get the job done. So here's what it looks like now:

In the future, the plan is to make it look a little prettier with a piece of wood clad in aluminum (white so it blends with the siding) but for now, the water has stopped pouring in the gap, so I'm happy. And hopefully this'll never happen again:

Yep, that's rain water that leaked into my light fixture through the roof/wall gap. Pretty, isn't it? Not so much. There was also a lot of water in the section of my basement that's directly underneath, and I hope it's gone for good, too.
I have a back porch. It has a roof. If you've seen any of the pics of my backyard (like the snowfall one below), they're taken from directly under this roof. Anyway, when the main roof and the front and back porches were re-shingled shortly before I bought the house, someone decided it'd be a good idea to only do the job half way. They redid the shingles, but didn't install any flashing in the space where the roof meets the wall.
 Or a closer view:
I don't know if these pics are doing the gap justice. It was big, and causing problems. I really shouldn't be surprised, because I'm finding that so many things have been done in a similar manner (half-assed). But hey, I'm always up for a challenge, so I figured I could make it right.
I did lots of research, and gathered the requisite tools and supplies to install step flashing to keep water from entering the gap. I scheduled the assistance of a ladder-holding friend (thanks, Mish!). I found myself a bright, sunny day. I even got up there on each side of the peak and ran the circular saw along the roof line, to get enough of the shingles out of the way to get the job done (this was step one, and my first ever experience using a circular saw. My advice? Try it on solid ground first. But, hey, I got it done)
And then I hit a wall. Well, figuratively, at least. Basically, what I discovered that day was two-fold:
1. No matter how much I might wish otherwise, I do not have the arm strength of a man. Not even an average or somewhat wimpy man. That arm strength was a requirement of this job that I didn't anticipate.
2. I'm just not cool with working on that kind of angle, at that kind of height. The pics don't really tell you how high up I was, or how steep the roof angle, so just trust me: it was bad. Not bad for someone accustomed to such jobs, but bad for someone like me who's not a huge fan of heights to begin with. Add to that the wobbliness inherent in using a ladder at that height and...
End result: I eventually had to concede defeat, and call in a handyman. Thankfully Mish (the ladder-holding friend) knew of one who could get the job done. So here's what it looks like now:

In the future, the plan is to make it look a little prettier with a piece of wood clad in aluminum (white so it blends with the siding) but for now, the water has stopped pouring in the gap, so I'm happy. And hopefully this'll never happen again:

Yep, that's rain water that leaked into my light fixture through the roof/wall gap. Pretty, isn't it? Not so much. There was also a lot of water in the section of my basement that's directly underneath, and I hope it's gone for good, too.
Saturday, November 7, 2009
First Snowfall
 First snow of the year today. (A lot earlier than I'd like to see it, but pretty!)
And yes, I'm still counting 'firsts' like this in the house, but I'm allowed - it's only been six months since I bought it!
(SIX months!! How'd that happen?) :)
(SIX months!! How'd that happen?) :)
Thursday, October 29, 2009
Post Posts Post
Ok, I'm going to warn you upfront, this is going to be a long one. But it was a long (long looooong LONG) time coming, and a really big deal, so please bear with me.
:)
I have spent an awful lot of time over the past several months in my front yard. On the front of the house there's a little 'entryway' that sticks out from the rest of the house, and in the decades since it was built, it has been supported on two 4x4 angled wood beams set into little pockets in the foundation. Not smart. The beams (I now know) were pretty rotten, and the entryway had sagged significantly over time.
So, to keep this little slice of square footage from falling off the side of my house entirely, it was necessary to fix the problem (it also had to be done before a number of other projects - like painting and patching holes in the walls inside - since jacking it up was likely to cause more damage anyway).
So here we go. First came the digging of the giant holes, into which the concrete forms would be placed. Fortunately, with the new house being built next door, I was able to take advantage of the excavation crew working there, and didn't have to dig these by hand(!):
 (two holes, each four feet deep, and at least two feet around)
Once these were dug, I couldn't use my front door anymore because the excavators had to remove the deck/stair supports in order to dig the holes.
Next, I placed the forms (bigfoots and sonotubes) in the holes, and with the generous help of the builders/neighbours next door, shovelled the dirt back in around them. Unfortunately, a few days later and before I could get the concrete into the forms, we had a huge rainstorm that moved them, which meant digging the whole thing out again(!), re-positioning them, and shovelling all that dirt back in. Is it any wonder this entire process took a few months??
Anyway, I don't really want to think about all that (ever again!) so here they are after the concrete was finally mixed and poured:
 (notice those old angled beams I mentioned - the white and the navy ones,
not that random board leaning against the wall)

I know, gorgeous, right? :) While I'd much rather have spent the past couple months decorating the interior, this was important stuff. I now have a safe structure - and this paved the way for me to get going on all that inside stuff I've been thinking about all summer!
Oh yeah, and as an added bonus - I can now use my front door again! This stairway/deck is temporary - just to get me through the winter. I figure I can use that time to figure out exactly what I want to do to the front of the house next summer - what size deck to build, whether or not to move the door around to the front, etc. So we reused the old stair framework, but made it nice and sturdy with new deck boards and supports:

Oh, do me a favour and please just ignore that ghetto extension cord draped across the front of my house - the neighbours need power for a few days and I don't have an outside outlet. A little electricity's the least I can offer in return for all the hours they spent shovelling dirt into those giant holes!
And one last thing. Dad, there is NO way I could have done this without your help. Through every step of this process, you were there. 'Thank you' does not seem sufficient. But thank you.
:)
I have spent an awful lot of time over the past several months in my front yard. On the front of the house there's a little 'entryway' that sticks out from the rest of the house, and in the decades since it was built, it has been supported on two 4x4 angled wood beams set into little pockets in the foundation. Not smart. The beams (I now know) were pretty rotten, and the entryway had sagged significantly over time.
So, to keep this little slice of square footage from falling off the side of my house entirely, it was necessary to fix the problem (it also had to be done before a number of other projects - like painting and patching holes in the walls inside - since jacking it up was likely to cause more damage anyway).
So here we go. First came the digging of the giant holes, into which the concrete forms would be placed. Fortunately, with the new house being built next door, I was able to take advantage of the excavation crew working there, and didn't have to dig these by hand(!):
 (two holes, each four feet deep, and at least two feet around)
Next, I placed the forms (bigfoots and sonotubes) in the holes, and with the generous help of the builders/neighbours next door, shovelled the dirt back in around them. Unfortunately, a few days later and before I could get the concrete into the forms, we had a huge rainstorm that moved them, which meant digging the whole thing out again(!), re-positioning them, and shovelling all that dirt back in. Is it any wonder this entire process took a few months??
Anyway, I don't really want to think about all that (ever again!) so here they are after the concrete was finally mixed and poured:
 (notice those old angled beams I mentioned - the white and the navy ones,
not that random board leaning against the wall)
Anyway, then the jacking to correct the sag began. It was determined that we couldn't do it all in one shot, but had to do it over a couple of weeks (makes sense when you think about it - the floor probably took 50+ years to get to where it was).
And (Hallelujah), at long last, this past weekend the jacking was completed and the permanent posts were put in place. Check it out:
And (Hallelujah), at long last, this past weekend the jacking was completed and the permanent posts were put in place. Check it out:

I know, gorgeous, right? :) While I'd much rather have spent the past couple months decorating the interior, this was important stuff. I now have a safe structure - and this paved the way for me to get going on all that inside stuff I've been thinking about all summer!
Oh yeah, and as an added bonus - I can now use my front door again! This stairway/deck is temporary - just to get me through the winter. I figure I can use that time to figure out exactly what I want to do to the front of the house next summer - what size deck to build, whether or not to move the door around to the front, etc. So we reused the old stair framework, but made it nice and sturdy with new deck boards and supports:

Oh, do me a favour and please just ignore that ghetto extension cord draped across the front of my house - the neighbours need power for a few days and I don't have an outside outlet. A little electricity's the least I can offer in return for all the hours they spent shovelling dirt into those giant holes!
And one last thing. Dad, there is NO way I could have done this without your help. Through every step of this process, you were there. 'Thank you' does not seem sufficient. But thank you.
Wednesday, October 21, 2009
Detail-Oriented
Maybe I've lost sight of the big picture. Or maybe I'm just a little overwhelmed by all the work still on my 'to do' list. In any case, just about every room in my house is still beige and bland and waiting to be decorated, but check this out:

As it turns out, I forgot to take a 'before' shot of this one, but let me paint you a picture: a couple days ago my cold air return was a faded and paint-splattered dark brown and just downright dingy. I planned to replace it, but then thought 'why?' - it was still perfectly functional, just not very nice to look at. And given that those little 'hot air' vents cost $6 and up to replace, I can only imagine what this big one would've cost. As noted in (several!) previous posts, I much prefer the cost of a can of spray paint.
I chose this espresso brown in a satin finish, et voila! The pic doesn't really do it justice, but trust me - it looks brand new again. I also used the same colour to do the hot air vent in the same area (top right of the above pic), so that they match perfectly.
Oh, and here's a tip: while I had the grate out, I cut some black window screen (sold by the foot at my local hardware store) and stapled it over the opening in the floor. The duct cleaning guy suggested doing this so that I can simply vacuum the vent and any stray lint/dirt isn't automatically being sucked down into my ductwork and clogging it up. At about $3, it was a simple way to reduce the need for expensive duct cleaning. Works for me!
Saturday, October 10, 2009
Stand Tall
Since my 'big' projects don't seem to be coming together as quickly as I might like them to lately, it's time to take a look at one of the little details.
Did you happen to notice these in my dressing room project?

I just wanted to share a thrifty tip for helping tall boots keep their shape:


Presto! The placemat unrolls in the boot just enough to fill out the calf and keep the boot upright.
Did you happen to notice these in my dressing room project?

I just wanted to share a thrifty tip for helping tall boots keep their shape:

I took a simple plastic placemat (2 for $1 at my local dollar store), rolled it up, put it in the boot all the way down to the heel, and then zipped the boot back up.

Presto! The placemat unrolls in the boot just enough to fill out the calf and keep the boot upright.
Friday, September 25, 2009
Note to Vote
So I figure I need to do whatever I can to supplement my budget for all the work I still need/want to do on the house. Since I don't happen to have any spare organs I can sell(!), I've entered my living room in the Style at Home Makeover Contest. Hey, it's worth a shot - curb shopping can only take my decor so far!
The top prize is a $2,000 Home Depot gift card (and boy would that come in handy!!)
Here's the thing. It's partially a popularity contest, so I'd love it if you would take a minute to go here to VOTE (and comment. Take the opportunity to let me know your thoughts on what I should do with the space!). You may have to register to vote first, but it only takes a second, I promise!
As an added bonus: (1) my contest entry includes a sneak peak pic of my (currently rather shameful and as yet un-posted) living room. I'm nowhere near ready to post pics of it here, so get a glimpse there - just don't judge the sorry state it's in! :)
and (2) just for voting you're eligible to win a $50 gift card from Home Depot. Yay!
And hey, you can even vote once a day, if you're feeling generous.
Tuesday, September 22, 2009
Take a Number
The originals that came with the house:

But now that I've got a ladder (thanks, Kijiji!)...

I was finally able to put up my fab new house numbers! They're floating numbers, but (thanks to some awesome cutting and drilling help from a friend) I mounted them on a piece of reclaimed (aka garbage) acrylic which I frosted up just for the occasion.
LOVE them! They're just the first step in overhauling the look of the front of the house (remember this post?), so stay tuned!
Saturday, September 19, 2009
Wonder Why?
Despite statistics that show that 'everybody's doing it', people often seem to suggest that it's strange that I, as a single woman, have chosen to buy a house on my own. The most 'puzzling' question I've been asked so far in my four-plus months as a homeowner was simply 'Why?' As in "You live here alone? But WHY??!" (with an underlying tone of 'Are you crazy?!')
How do I answer that?
- I hated wasting money on rent?
- I suddenly found myself without a place to live, and had to quickly decide to 'jump' into the housing market, ready or not?
- I was approaching 30 and it seemed like the next logical step?
- the time was right (low interest rates, slow economy, etc.)?
- because I believe that owning real estate is an important step toward financial security?
- I'm tired of dealing with landlords?
It's funny, but the question caught me off guard and really made me think, because, although the answer is all of these reasons and more, the truth is I don't care why anymore - I'm just so very glad I'm here.
Is it scary, lonely, overwhelming, exhausting to do this on my own? Yes, yes, and yes. But also empowering, exciting, and more personally gratifying than I even imagined, and I wouldn't trade this experience for the world.
Anyone else want to tell me they think I'm crazy? :)
(oh, and 10 points to anyone who caught the title's reference to the old ATV/CTV educational show with Richard Zurawski!)
Monday, September 14, 2009
Neighbourly
So I've been here for a few months now, and it wasn't until a couple days ago that I finally met some of my neighbours. It's not that I'm anti-social, but my house is set back from the street a bit, and there are no other houses in sight, so...
Anyway, last week I met some lovely neighbours named Judy and Gordie as they were out for a walk and stopped to look at the house being built next door, and we got to chatting. Then tonight, when I was out in the yard (still shovelling dirt!), they stopped by with a very kind 'welcome to the neighbourhood':

Wasn't that sweet of them? It made my day!
Sunday, September 13, 2009
oh the glamour
It's been a busy weekend! In addition to the never-ending dirt shovelling and concrete mixing going on in the front yard (ok, I lie, the end is finally in sight with that one! I'll post when it's complete), today I swapped out my old, inefficient, construction adhesive-marred, frequently running toilet for a new 'low-flow' model.
 Do try to ignore the floor (like I do!) - it's damaged and needs to go, but I want to finish up all these 'energy' improvements first. Once I get all those rebate dollars back I can move on to 'prettier' projects like tiling the bathroom floor.
All that painting and stuff will still be lots of work, I know, but it's definitely not like today's job. Because we all know about toilets, right? Gross.
out with the old:


and in with the new!:
 Do try to ignore the floor (like I do!) - it's damaged and needs to go, but I want to finish up all these 'energy' improvements first. Once I get all those rebate dollars back I can move on to 'prettier' projects like tiling the bathroom floor.
All that painting and stuff will still be lots of work, I know, but it's definitely not like today's job. Because we all know about toilets, right? Gross.
Monday, September 7, 2009


Friday, September 4, 2009
Feelin' the Heat
Another big day in the life of my house, another major chunk of my house budget gone. *Sigh*.
I'm sure I'll be glad I made this decision when the winter winds are howling around outside and my house is snug and warm, but that wasn't really my thought today. I'm usually pretty practical, but today I could only think of how many other great (and pretty!) projects I could do with the amount I spent on this latest purchase.
Anyway, without further 'ado', here's the before (visually documented in order to impart the 'significance' of this purchase (read: to convince myself), not because the pics are particularly interesting!):

In the words of the installers of the new one, she was a 'dinosaur'. Their estimate of her age was '40+ years' (when the average lifespan of a furnace is 20-25). Well, that dinosaur is now extinct, replaced by this darling:

She's sleeker, shinier, cleaner, more efficient, more powerful (while using less power!) and just an all-around much better beast. So yes, a smart choice.
One drawback that emerged today: while removing the old one the installers noted that my duct work is in DESPERATE need of a good cleaning. Just another item to add to my 'to do' list - and my dwindling budget! Don't worry, I won't be posting pics of THAT process, I had a glimpse of what's in there today and it was pretty disgusting.
Tuesday, September 1, 2009
All Dressed Up!
There've been lots of changes around this place over the past couple of weeks, but not much is complete yet so I'll have to write more later. This one, however, can't wait...!
This past weekend, I finally got to tackle a project that I've been wanting to do since the very first day I walked through this house. As is common in a house of this age, what closets I do have are pretty tiny, so right from day one I wanted to turn the smallest 'bedroom' into my dressing room. I've been using it that way since I moved in, but in a makeshift sort of way (temporary clothing rack, sweaters in a bag, stuff on the floor - not good!). That all changed a couple days ago!
Here's the before shot (notice the lovely pipe as 'focal point'):

Thanks to the generous help of my dad (he's the carpenter in the family - I just try to be a decent apprentice!) here is the realization of what I've been planning and excitedly waiting for over the last couple of months:

(recognize that ottoman?)
And from the other side:

I love that it fills the entire length of the wall, and makes great use of the space under that sloped ceiling. There's even some room behind all the clothing storage to store things like my luggage - bonus!! I really think it's the best use of the space in that room, while still leaving it feeling open and spacious.
Finally, just for good measure, here's my vanity on the other side of the room:

All in all, I've achieved my goal ('girly heaven'!) - a completely functional space that holds all of my clothes and shoes, and lets me stay organized (and feels like an exclusive boutique!). It was so nice to do a 'fun' project for a change, since so much of what I've been working on this summer is the boring structural stuff (yeah, it's important, but that doesn't mean it's not boring!). I get to enjoy this space every day of the week, so it felt like quite the indulgence!
Speaking of indulgence, the price tag for this entire project came in at $120 including tax (and that includes all the bits and pieces - like screws, etc. - but not the dresser, which I already had), so it really wasn't such a 'splurge' after all. A custom-built closet for the price of a generic closet organizer - score!
Thanks again, Dad. I couldn't have done it without you! :)
Thursday, August 20, 2009
A Very Big Day
Before today, my house had zero insulation. None. Well, a useless sprinkling of it in the attic, but nothing in the walls at all. Can you imagine building a house with NO insulation in it?!
Anyway, that all changed today...

Here they are, blowing insulation into the attic and sloped ceilings very early this morning (before it got too hot up there to work).
 The house around midday, riddled with holes...

And by the end of the day, from the outside you wouldn't even know they'd been here! But the inside is a much different story - it's SO much cooler!! I'm so excited to have this finished - and even more excited that the government will cover the work (through the ecoENERGY retrofit rebate program)!!
Isn't it crazy how priorities can change? Who'd have thought I'd ever get this excited about INSULATION? :)
Anyway, that all changed today...

Here they are, blowing insulation into the attic and sloped ceilings very early this morning (before it got too hot up there to work).
 The house around midday, riddled with holes...
And by the end of the day, from the outside you wouldn't even know they'd been here! But the inside is a much different story - it's SO much cooler!! I'm so excited to have this finished - and even more excited that the government will cover the work (through the ecoENERGY retrofit rebate program)!!
Isn't it crazy how priorities can change? Who'd have thought I'd ever get this excited about INSULATION? :)
HGTV - Design Dilemma
On a whim, I emailed HGTV a few months ago when they were looking for outdoor design dilemmas... Well guess what? They featured my 'dilemma' (and my house) on their website this week!
Have a look:
http://www.hgtv.ca/BLOG/archive/2009/08/19/outdoor-design-dilemma-with-carson-arthur-when-back-of-the-house-is-actually-the-front.aspx
What do you think of their suggestions?
Have a look:
http://www.hgtv.ca/BLOG/archive/2009/08/19/outdoor-design-dilemma-with-carson-arthur-when-back-of-the-house-is-actually-the-front.aspx
What do you think of their suggestions?
Friday, August 14, 2009

Sunday, August 9, 2009
Kicked to the Curb
Yep, I must still be high on spray paint fumes! Here comes another fun one:
After an eventful evening last week involving a soccer game, a trip to the ER, and a couple of stitches - yikes! - my friend Mish and I took a little detour on the way home to do some curb shopping (when we happen upon a neighbourhood's garbage night, we can't resist!).
Look what I found:
 They're a little weathered, but they're cute, and small enough to fit on my deck, so I figured I'd help them out with a bit of glossy paint to ward off the elements (the fun colour choice was just for me!)
 There, they should last a while longer now!
Tuesday, August 4, 2009
Cuts Like a Knife
Here's a crafty 'problem-solver' that I can't take any credit for at all. It's all over the internet, with pricey designer versions here, here, and variations well, everywhere... and tutorials to make it yourself here and here.
The 'problem' was that I had more knives than I had slots in my knife block. It happens, right? Well this DIY knife block has no 'slots', so it can accomodate as many knives as I want!
I found a stylin' bamboo box at Value Village for $2 (I seem to be doing well there lately!), and stocked up on a few packages of bamboo skewers from the dollar store.
 After a fair bit of trimming, here's what I ended up with:


Not too shabby, eh?! A designer look for a fraction of the cost. That's my kind of craft project!
The 'problem' was that I had more knives than I had slots in my knife block. It happens, right? Well this DIY knife block has no 'slots', so it can accomodate as many knives as I want!
I found a stylin' bamboo box at Value Village for $2 (I seem to be doing well there lately!), and stocked up on a few packages of bamboo skewers from the dollar store.
 After a fair bit of trimming, here's what I ended up with:

Not too shabby, eh?! A designer look for a fraction of the cost. That's my kind of craft project!
Thursday, July 30, 2009
What a Difference a Spray Makes!
In case you don't know me, my name is Kerry and I'm a thrift-aholic. Cheap, frugal, low budget, I call it various names, but the point is that if I can't do a decor project/makeover for less than $10, I'm probably not going to do it. Or, at least, I'm going to think REALLY hard about it (and probably obsess for a ridiculously long time). So, are you ready for a couple of super-cheap upgrades? Here goes!
The kitchen is NOT my favourite room of the house. I don't often cook, so it was fine with me that the house I bought has a very small kitchen. Some day soon I'd like to upgrade the appliances (they're very old and very ugly), but otherwise the kitchen can stay as is, because I don't spend much time in it. BUT, when I moved in, the room's only light (and air circulation!) source looked like this: (click to enlarge - I dare you.)

I personally can't recall ever seeing a nastier looking ceiling fan. The dirt can be easily remedied, but the damaged faux wood veneer and 'gold' accents? I'm not a 'fan' (pun intended). Enter my favourite inexpensive decorating tools, a couple of trusty cans of spray paint:

A little red and aluminum-coloured spray paint and the fan actually looks like it belongs! It now coordinates with my favourite fabric panel on the far wall (the colours of which, coincidentally, set the tone for the whole room). Not bad for a short term fix. I have a number of light fixtures that need to be upgraded, but at least now this one doesn't have to be first on the list!
Next up was a mirror for my bathroom. The wall in front of the sink is actually part of the sloped ceiling, so a traditional bathroom mirror or medicine cabinet wouldn't work. After a recent trip to Value Village, I came home with this beauty for a mere $4:

It wasn't perfect (a few chips, as pictured), but it would do. I like the simple, wide frame, and the fact that it's got a really slim profile - space is at a premium in the bathroom!
 It might be tough to tell in this pic, but I painted it with some of the aluminum-coloured spray paint left over from the ceiling fan project. Et voila, my bathroom finally has a mirror!
So what do you think? Love 'em? Hate 'em? Has spray paint made a difference in your world, too?
The kitchen is NOT my favourite room of the house. I don't often cook, so it was fine with me that the house I bought has a very small kitchen. Some day soon I'd like to upgrade the appliances (they're very old and very ugly), but otherwise the kitchen can stay as is, because I don't spend much time in it. BUT, when I moved in, the room's only light (and air circulation!) source looked like this: (click to enlarge - I dare you.)

I personally can't recall ever seeing a nastier looking ceiling fan. The dirt can be easily remedied, but the damaged faux wood veneer and 'gold' accents? I'm not a 'fan' (pun intended). Enter my favourite inexpensive decorating tools, a couple of trusty cans of spray paint:

A little red and aluminum-coloured spray paint and the fan actually looks like it belongs! It now coordinates with my favourite fabric panel on the far wall (the colours of which, coincidentally, set the tone for the whole room). Not bad for a short term fix. I have a number of light fixtures that need to be upgraded, but at least now this one doesn't have to be first on the list!
Next up was a mirror for my bathroom. The wall in front of the sink is actually part of the sloped ceiling, so a traditional bathroom mirror or medicine cabinet wouldn't work. After a recent trip to Value Village, I came home with this beauty for a mere $4:

It wasn't perfect (a few chips, as pictured), but it would do. I like the simple, wide frame, and the fact that it's got a really slim profile - space is at a premium in the bathroom!
 It might be tough to tell in this pic, but I painted it with some of the aluminum-coloured spray paint left over from the ceiling fan project. Et voila, my bathroom finally has a mirror!
 So what do you think? Love 'em? Hate 'em? Has spray paint made a difference in your world, too?
Subscribe to:
Posts (Atom)